
-
A FREE 43 page Full Color eBook – Available in PDF and iBook Format (iPhone/iPad)
- 15 FREE HD Step by Step Videos
- 110 FREE Full Color Pictures
NOTE* All Park Tool pictures are courtesy of Park Tool. Thank you Park Tool!
To download the free eBook and videos please visit www.flocycling.com/buildabike.php and enter your email address.
- Torque Wrench (TW-2 or TW-6)
- Socket and Bit Set (SBS-1)
- Cassette Lockring Tool (FR-5)
- Alternate* Adjustable Wrench (PAW-12)
 |
| Tools |
- Cassette
- Wheels
- Quick Release Skewers
 |
| Parts |
- Be sure your cassette is compatible with your rear derailleur. For example, make sure if you have a 10 speed derailleur that you are using a 10 speed cassette.
- Install your tires before installing your wheels. You can learn how to install your tires here (http://www.youtube.com/watch?v=w5cm8T1KusU)
1. Your cassette will have a specific keyed pattern that will mate with the hub body on your wheel. Be sure to line the keyed fitting of the hub body up with your cassette. For a Shimano/SRAM style cassette, I typically look for the thinnest raised ridge and use that as a reference point when installing the cassette.
2. Start by placing the largest gear(s) on first (see Figure 1). Often times the three largest gears are connected together.
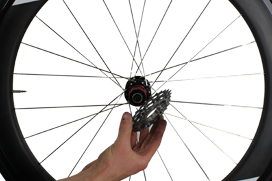 |
| Figure 1 |
3. Continue placing the gears and spacers on the hub body in the proper order (see Figure 2). If you do not know the proper order of gears and spacers, please refer to the manufacturers manual for your cassette.
 |
| Figure 2 |
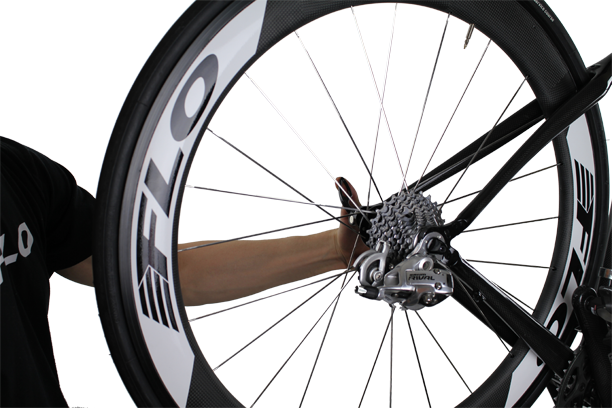
4. Once you have placed all of the gears on the hub body, screw the cassette lock ring into place using a cassette lock ring tool and wrench (see Figure 3). Be sure to torque the cassette lock ring to the manufacturers recommended torque value.
 |
| Figure 3 |
5. Insert the rear wheel into the rear dropouts of the bicycle (see Figure 4). Note: Make sure you tires are installed first. If you need help installing your tires, please follow our other tutorial here (clincher only).
 |
| Figure 4 |
6. Tighten the quick release (see Figure 5). Make sure the quick release lever is on the non-drive side of the bicycle.
 |
| Figure 5 |
7. You can repeat the same process for the front wheel with the exception of installing a cassette.
8. You now have a properly installed cassette and wheelset.
This completes the installation of your cassette and wheels.
We hope you enjoyed this how to article. For more great content, please register for our free monthly newsletter at the top of the column on the right. We send links to all the articles we post during the month.

Co-founder at FLO Cycling. Jon manages the day to day operations and acts as the lead engineer for all FLO products.